Introduction
A chicken run can look secure from the outside and still have a weakness at ground level. Predators such as dogs, foxes, and other local wildlife may dig beneath a fence to reach your flock. Even a small gap along the bottom of the enclosure can become an entry point.
One effective way to reduce this risk is to install a hardware-cloth barrier around the perimeter. But how deep should you bury it?
There is no single depth that works for every chicken run. The right installation depends on your soil, enclosure design, and the predators in your area. A buried vertical barrier can help, while a horizontal hardware-cloth apron is often a practical alternative that requires less digging.
Here is how to choose an approach and install it correctly to help protect your chickens. 🏡
1. How Deep Should Hardware Cloth Be Buried?
For a buried vertical barrier, about 12–18 inches deep is a common starting point for planning, but it is not a universal guarantee. Some sites or digging predators may require a deeper barrier, and local guidance may recommend a different design.
Before choosing a depth, consider:
- Predators: Animals differ in their digging ability and behavior.
- Soil type: Loose soil may be easier to dig through than compacted ground.
- Terrain: Slopes, drainage channels, and uneven ground can create weak spots.
- Run construction: The barrier must connect securely to the run’s frame.
- Local conditions: Observe signs of digging and seek local wildlife-management guidance where needed.
A deeper trench alone does not guarantee protection. If the mesh is loose, has gaps, or stops short of the enclosure frame, a predator may still find a way through.
2. Buried Barrier vs. Horizontal Apron: Which Is Better?
You generally have two practical options for protecting the base of a chicken run.
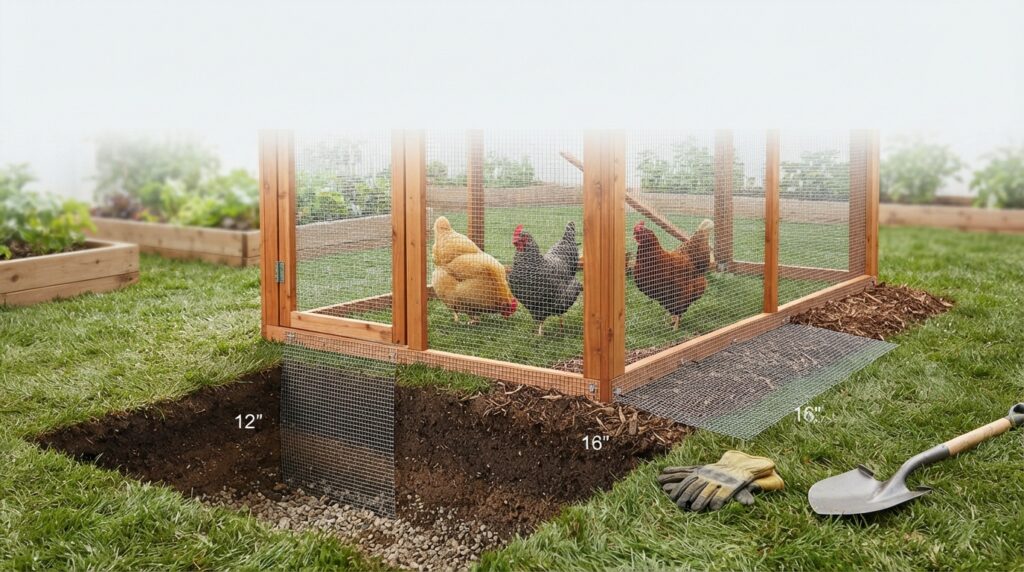
<box gap={3}> <row align=start gap={3}> <AsyncImage query=”chicken run vertical buried galvanized hardware cloth predator barrier trench construction” aspectRatio=”4:3″ maxWidth=”132px” /> <box flex=”1″ gap={1}> **Option A: Vertical buried barrier**
  Hardware cloth runs downward from the base of the enclosure into a trench. This can make digging beneath the fence more difficult, but it requires excavation and careful installation along the entire perimeter.
</box>
</row> <divider color=”subtle” /> <row align=start gap={3}> <AsyncImage query=”horizontal hardware cloth predator apron extending outward from wooden chicken run base before soil covering” aspectRatio=”4:3″ maxWidth=”132px” /> <box flex=”1″ gap={1}> **Option B: Horizontal hardware-cloth apron**
  Mesh extends outward along the ground from the run's base and is secured to the structure. A width of roughly **18–24 inches** is a common starting point, although wider protection may be appropriate for some sites.
</box>
</row> </box>
Why an apron can work well
A predator approaching the fence may begin digging close to the wall. A horizontal mesh apron makes that digging more difficult because the animal encounters the barrier as it digs downward.
An apron can also be easier to install around an existing run because you may not need to dig a deep trench along the entire perimeter.
However, an apron is not foolproof. It must be secured firmly, and its outer edge should not leave an easy opening for digging.
3. How to Install a Buried Hardware-Cloth Barrier
If you choose a vertical barrier, follow these general steps.
Step 1: Inspect the perimeter
Walk around the entire chicken run. Look for loose soil, existing holes, gaps beneath the fence, and places where the ground slopes away from the frame.
Mark the areas that need protection, but plan for a continuous barrier rather than reinforcing only the obvious weak points.
Step 2: Dig a trench
Dig a trench along the outside perimeter to your planned depth. The trench must be deep enough for the intended barrier while allowing the mesh to connect securely to the run.
Check for buried utilities before digging, and avoid damaging drainage systems or tree roots.
Step 3: Attach the mesh to the frame
Use suitable galvanized welded hardware cloth and fasteners appropriate for the frame material.
Secure the upper edge firmly to the run’s lower framing. Use screws and washers or another robust attachment system rather than relying on a few weak attachment points.
Choose mesh openings small enough for the predators you are trying to exclude. Hardware cloth with openings around 1/2 inch is commonly used for many backyard-coop applications, but mesh strength and local predator risks also matter.
Step 4: Secure overlaps and corners
If you need multiple pieces, overlap and fasten them so there are no open seams. Pay particular attention to corners, gates, and transitions between different sections of the enclosure.
Step 5: Backfill the trench
Return soil to the trench and compact it carefully without damaging or displacing the mesh.
Keep sharp cut wire ends covered or safely positioned away from chickens and people.
Step 6: Inspect the finished barrier
Check the entire perimeter to make sure the mesh remains attached and there are no gaps at ground level. Recheck after heavy rain or soil movement.
4. How to Install a Horizontal Apron
For many backyard keepers, an apron is a manageable DIY solution.
- Prepare the ground. Remove debris and level the immediate perimeter where practical.
- Attach the inner edge. Secure the hardware cloth to the bottom of the run’s frame.
- Extend it outward. Lay the mesh flat along the ground, commonly around 18–24 inches wide as a starting point.
- Secure the apron. Use appropriate fasteners or landscape staples to keep it in place while ensuring the connection to the enclosure remains strong.
- Cover the mesh. A suitable layer of soil, gravel, or another safe surface can help conceal the barrier and reduce exposed sharp edges.
- Check the whole perimeter. Ensure the apron joins securely at corners, gates, and adjoining sections.
The apron should not create a trip hazard or leave sharp wire exposed. Make sure chickens cannot access loose mesh edges, and avoid covering the barrier in a way that makes inspection impossible.
5. Choose Hardware Cloth That Can Handle the Job
Burial depth is only one part of predator protection. Weak mesh can bend or break, and poor attachment can allow the entire barrier to pull away from the run.
When selecting materials, consider:
- Welded construction: Generally preferable to lightweight chicken wire for predator barriers.
- Appropriate wire thickness: Stronger wire may be needed where larger or more powerful animals are present.
- Corrosion resistance: Galvanized or otherwise suitable outdoor-rated mesh can help resist rust.
- Opening size: Smaller openings can help exclude smaller animals, depending on the threat.
- Secure connections: Fasteners and framing must be strong enough to hold the mesh in place.
Chicken wire is useful for keeping chickens contained, but it is not a dependable standalone barrier against determined predators.
6. Avoid These Common Installation Mistakes ⚠️
Stopping the barrier at the corners. Corners are potential weak points. Keep the barrier continuous and securely joined.
Leaving a gap beneath the gate. A strong fence does little good if predators can enter through an unsecured gate or a gap below it.
Using weak fasteners. Mesh can be pulled loose even when the wire itself is sturdy.
Burying mesh without attaching it to the frame. A loose barrier may shift and create an opening.
Ignoring drainage. Poorly planned trenches can collect water or contribute to erosion. Consider how runoff moves around the run before digging.
Assuming one installation stops every predator. Climbing, reaching, overhead entry, and damage to doors or roofing require additional protections.
7. Maintain the Barrier After Installation
A predator barrier needs occasional attention, especially after storms or changes in the ground.
Use this quick checklist:
- Look for new digging or disturbed soil.
- Check for rust, broken welds, and bent mesh.
- Inspect the mesh-to-frame connection.
- Check corners, gates, and overlapping sections.
- Look for erosion that exposes or undermines the barrier.
- Repair loose fasteners and exposed sharp edges promptly.
If you discover a hole, inspect the surrounding area before repairing it. The animal may have found another vulnerable point nearby.
Final Thoughts 🐓
For a vertical buried barrier, 12–18 inches is a reasonable starting point to consider, not a guaranteed predator-proof depth. A horizontal apron extending roughly 18–24 inches outward can be a practical alternative for many backyard chicken runs.
The best choice depends on local predators, soil conditions, drainage, and how securely the barrier connects to the enclosure. Strong mesh, secure fasteners, protected corners, and regular inspections are just as important as depth.
Before starting your project, identify the most likely threats to your flock and choose a design suited to your property. A continuous, well-maintained barrier can make digging into your chicken run more difficult and give your birds an extra layer of protection.