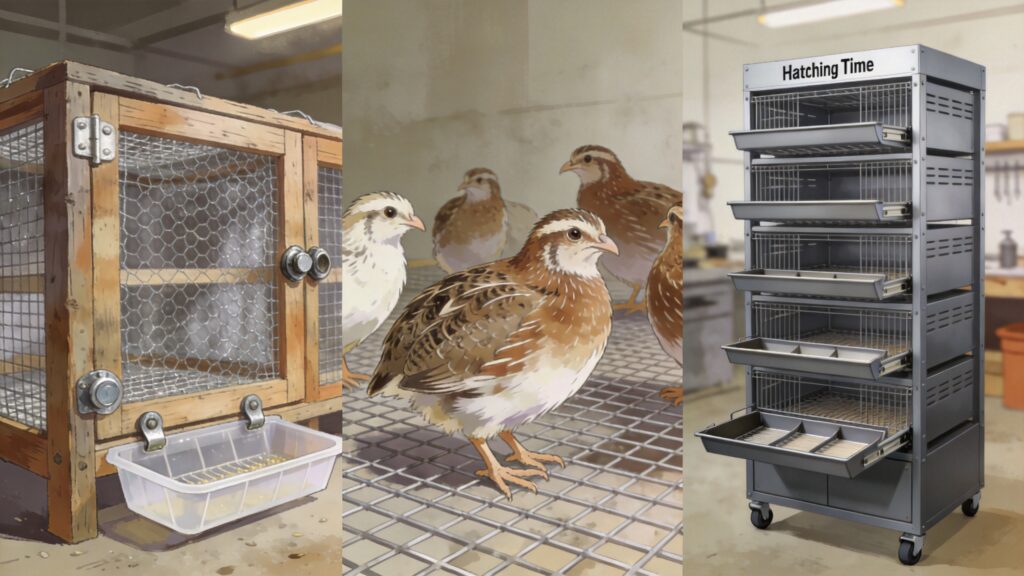
DIY vs. Prefab Quail Cages: Which Setup Saves You Money and Headaches?
Raising quail for eggs, meat, or as pets has exploded in popularity among American homesteaders and backyard poultry enthusiasts. But before you bring home those adorable coturnix chicks, you face a critical decision: build your own cage or buy a pre-made one. This isn’t just about cost—it’s about durability, cleaning ease, and long-term sanity. In this guide, I’ll walk you through the real trade-offs between DIY and prefab options, with an honest look at popular brands like Hatching Time, practical material choices, and the nitty-gritty of daily maintenance. By the end, you’ll know exactly which route fits your flock size, budget, and skill level.
— Introduction, ~60 words
Why Cage Choice Matters More Than You Think
Quail are small, but their housing needs are specific. Unlike chickens, they fly straight up when startled, so a low ceiling without proper netting leads to head injuries. They need 1/2-inch or 1/4-inch hardware cloth to prevent escape and keep out predators. And because quail produce a surprising amount of droppings for their size, cleaning access can make or break your hobby. A poorly designed cage—whether DIY or prefab—can become a nightmare of stuck feeders, rusted corners, and daily scrubbing. Understanding the differences upfront saves you time, money, and frustration.
Reviewing Popular Prefab Cages: Hatching Time and Beyond
Commercial prefab cages have come a long way. Brands like Hatching Time have cornered the American market with their modular, stackable designs. Let’s look at what you actually get.
Hatching Time Prefab Cages: The Gold Standard?
Hatching Time offers several models, from the 6-compartment starter kit to larger expandable systems. Their cages are made of heavy-duty galvanized wire with a welded frame and come with slide-out dropping trays, built-in feeders, and waterers. The key features:
- Easy assembly – everything bolts together with included hardware; no cutting or drilling.
- Stackability – you can stack up to 5 units high, saving floor space in a garage or barn.
- Removable trays – each tier has a shallow galvanized tray that slides out for quick cleaning.
- Metal legs with casters – easy to move around.
But no product is perfect. Common complaints include:
- Thin wire gauge – some users report the floor wire sagging under heavy birds if not supported.
- Feeder design – the standard trough feeders can waste feed if not adjusted properly.
- Price – a single 12-compartment unit runs around $250–$300, and stacking multiple tiers adds up fast.
“I bought a Hatching Time 6-compartment cage for my first batch of 12 quail. Assembly took 20 minutes. But within six months, the dropping tray started rusting at the seams because I didn’t dry it after pressure washing. I now spray it with cooking oil after cleaning.” — Jenna R., backyard quail keeper, Ohio
Other prefab brands worth mentioning: Brinsea (high-end, durable but expensive), MyPetQuail (smaller cages for pet quail), and generic Amazon options (often cheaper but with flimsy wire and missing hardware). Always check the wire gauge (14–16 ga is ideal) and whether the tray is truly removable without tools.
DIY Materials and Reinforcement Tips for a Strong, Safe Cage
Building your own quail cage gives you total control over size, materials, and cost. However, it also requires more skill and time. Here is what you need to know to do it right.
Best DIY Materials
The standard DIY quail cage uses a wooden frame with hardware cloth panels. But wood alone rots if exposed to moisture and droppings. A better approach:
- Frame: Use pressure-treated 2×4 or 2×2 lumber for the base legs, but consider using galvanized steel studs (from drywall supplies) for a rust-proof, lightweight frame. Alternatively, PVC pipe works for small cages but lacks rigidity.
- Walls and floor: 1/2-inch x 1/2-inch galvanized hardware cloth (not chicken wire!) is essential. Chicken wire has openings too large for quail and offers no predator resistance. For the floor, use 1/4-inch x 1/2-inch hardware cloth to prevent feet from slipping through.
- Fasteners: Use stainless steel or galvanized screws and fender washers to secure the wire. Staples pop out over time and create gaps.
- Dropping trays: Buy polypropylene plastic trays (like those used for rabbit cages) or make your own from galvanized sheet metal with folded edges to avoid sharp cuts.
Reinforcement Tips for Longevity
DIY cages fail in predictable places. Here’s how to reinforce them:
- Double up the floor mesh – Lay a second layer of 1/2-inch hardware cloth under the main floor, offset by half a mesh opening. This creates a stronger grid that prevents sagging and gives quail better grip.
- Reinforce corners with angle brackets – Wood corners split over time from weight. Use metal corner brackets (L-brackets) on all interior corners, both top and bottom.
- Add a perimeter lip – attach a 2-inch strip of sheet metal or plastic along the bottom edge of the cage to prevent quail from kicking litter out through the floor gaps.
- Waterproof everything – apply two coats of polyurethane or marine-grade varnish to wood surfaces (avoid inside the cage where birds might peck). For metal frames, use rust-inhibiting spray paint.
- Elevate off the ground – mount the cage on legs at least 24 inches high to allow airflow underneath and make cleaning easier. Add casters for mobility.
“I built a 4-tier DIY cage with a 2×4 frame and hardware cloth. Total cost was $120. The key was using fender washers on every screw – I haven’t had a single wire pop loose in two years. The only mistake: I didn’t add a lip, so I sweep up spilled feed every day.” — Mark T., homesteader, Tennessee
Cost, Durability, and Ease of Cleaning: A Head-to-Head Comparison
Let’s put the two approaches side by side using real numbers and experiences. The table below summarizes the trade-offs for a typical 12-quail setup (single tier).
| Factor | DIY (Wood + Hardware Cloth) | Prefab (e.g., Hatching Time) |
|---|---|---|
| Initial Cost | $50 – $100 (materials only) | $150 – $300 |
| Time to Build/Assemble | 4–8 hours (cutting, stapling, reinforcing) | 30–60 minutes (bolt together) |
| Durability (3-year estimate) | Moderate – wood may rot if not sealed; wire rusts in damp climates; joints need periodic tightening | High – galvanized metal frame resists rust; welded joints strong; but thin floor wire may sag |
| Ease of Cleaning | Depends on design – if you built with a slide-out tray, cleaning is quick; if not, you’ll need to scrub inside the cage | Excellent – removable trays, no crevices for poop to hide; most parts are hose-washable |
| Customizability | Complete freedom – any size, multiple compartments, integrated nest boxes, exterior feeding doors | Limited – fixed dimensions, no modifications without drilling new holes |
| Resale Value | Low – custom dimensions are hard to sell | Medium – brand-name cages hold 50–60% of value |
Cost Breakdown in Detail
For a DIY single-tier cage holding 12 quail (roughly 2 ft x 4 ft x 1 ft high), you’ll need:
- 8 ft of 2×4 lumber ($6)
- 6 ft x 4 ft roll of 1/2-inch hardware cloth ($25)
- Box of 1-inch stainless steel screws with fender washers ($12)
- Metal corner brackets ($5)
- Plastic dropping tray (or galvanized sheet metal, $10)
- Varnish or paint ($8)
- Total: ~$66
Now add a prefab Hatching Time single-tier 12-compartment cage: $249 on their website (often with included feeder and waterer). The DIY cage is 73% cheaper, but only if you already own basic tools (drill, saw, staple gun). If you need to buy tools, add another $50–100.
Durability Showdown
In dry climates (e.g., Arizona, Colorado), a well-built DIY wood cage can last 5–7 years. In humid regions (e.g., Florida, the Gulf Coast), expect wood to degrade in 2–3 years unless you use cedar or metal framing. Prefab cages, being fully galvanized, hold up better in wet conditions—but the thin wire gauge on some models can still rust at seams. Hatching Time’s warranty is typically 1 year; after that, replacements cost about 20% of the original price per panel. DIY repairs are cheaper: a new piece of hardware cloth costs $10, and replacing a rotted 2×4 is $3.
Cleaning: The Real Daily Grind
Quail poop is high in uric acid and dries into a cement-like crust. With a prefab cage, you slide out the tray, scrape it into a compost bin, and hose it off. Total time: 5 minutes. With a DIY cage without a tray, you have to open the cage door and scrub the floor wire from underneath, which disturbs the birds and takes 15–20 minutes. My recommendation: always design a DIY cage with a removable tray. Use plastic rabbit trays from Tractor Supply ($8 each) or a piece of corrugated plastic roofing cut to size. Alternatively, line the floor with newspaper and change it daily—cheap but wasteful.
Practical Advice: Which Path Should You Choose?
Your decision depends on three things: your flock size, your workshop skills, and your tolerance for ongoing maintenance.
When to Go DIY
- You have 10–30 quail and want to save money.
- You enjoy woodworking or have a garage with tools.
- You need a custom shape (e.g., to fit a specific shed corner).
- You are willing to spend a weekend building and a few hours each month on repairs.
When to Buy Prefab
- You have 40+ quail and need a stackable system to maximize vertical space.
- You value convenience over cost—you’d rather pay for a fast setup.
- You want a professional, uniform look for a home or classroom setting.
- You live in a high-humidity area where wood will rot quickly.
Case Study: 50 Quail in a Garage
Sarah in Michigan wanted to raise 50 coturnix for meat. She bought two Hatching Time 3-tier stackable units (12 compartments each, total $600). Assembly took one evening. Cleaning: she lines each tray with newspaper, swaps it every 3 days, and pressure washes the trays monthly. The birds are healthy, and her labor is minimal. Verdict: Prefab was the right call for scale and speed.
Case Study: 12 Pet Quail in a Basement
Mike in Colorado built a 2 x 3 ft DIY cage from scrap 2x4s and 1/2-inch hardware cloth. Total cost: $45. He added a slide-out plastic tray from a rabbit cage. The cage fits perfectly under his basement workbench. After 18 months, the wood is still solid. Verdict: DIY saved him $200 and gave him a perfect fit.
Conclusion: There’s No One-Size-Fits-All Answer
Both DIY and prefab quail cages have strengths that suit different keepers. If you have the tools, time, and a dry environment, a well-built DIY cage can give you a better fit and save significant money. But if you want a turnkey solution that handles humidity and large flocks with minimal effort, investing in a brand like Hatching Time is a smart choice. Whichever path you take, pay attention to wire gauge, tray design, and reinforcement—your quail will reward you with consistent eggs and fewer escapes.
— Conclusion, ~60 words
Final note: Always check local zoning laws before installing any quail housing. Some municipalities have restrictions on cage height or location. Happy quail keeping!