Choosing a chicken feeder seems simple until hens scatter pellets, rain reaches the tray, or rodent droppings appear near the coop. 🐔 The best feeder for a beginner is not automatically the fanciest model; it is the one that solves the main problem without creating extra work. A practical setup should keep feed accessible, reduce waste, stay dry, and make the feeding area less attractive to pests.
No feeder is completely mess-free because chickens naturally peck, scratch, and sometimes pull feed outward while eating. The realistic target is less waste, easier cleanup, and fewer opportunities for rodents, not a feeder that never drops a crumb. Before buying anything, decide whether your biggest problem is feed waste, rodents, rain, cleaning time, limited space, or frequent refilling.
First Question: Feed Waste Or Rodent Access?
Feed on the ground does not automatically mean rodents are taking it, because chickens may be creating most of the mess themselves. A feeder that is too low, too full, or easy to scratch into gives birds more chances to rake feed onto bedding. Keeping the feeding edge around the back height of mature birds can help reduce both contamination and unnecessary waste.
Rodent pressure requires a wider look because spilled pellets, unsecured feed bags, clutter, and gaps around structures can all provide food or shelter. 🐭 A rat-resistant feeder works better when stored feed is also kept dry in a tightly closed, rodent-resistant container and spills are removed regularly. If you close the feeder but leave grain underneath it every evening, rodents still have a reason to return.
Open, Hanging, And Port Feeders: The Beginner-Friendly Options
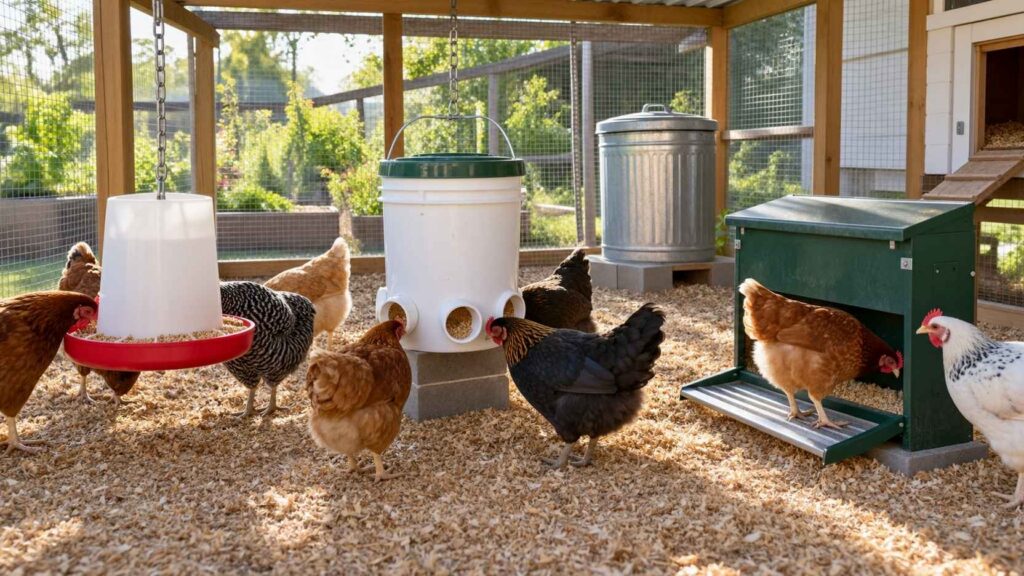
Traditional troughs and hanging tube feeders are inexpensive, easy to fill, and straightforward to wash, which makes them common first choices. A hanging feeder can work very well in a covered run when it is raised as the birds grow and not filled so deeply that feed is easily flicked out. 🌾 Its main weakness is that feed remains openly accessible to wildlife whenever the area is not secured.
Port-style feeders keep most feed inside a covered bucket or hopper and expose only smaller eating openings, which can improve containment and rain protection. They often suit small flocks because the container can hold several days of feed without the moving parts of a treadle system. However, covered does not mean rodent-proof, because pests may still investigate the openings or eat feed that hens pull onto the ground.
Treadle Feeders: When Paying More Can Make Sense
A treadle feeder keeps the feed compartment closed until a chicken steps on a platform that opens the feeding door. 🔒 Because the food is covered much of the time, the design can reduce easy access for wild birds and many rodents compared with an always-open tray. This makes treadle feeders especially attractive when pest pressure continues despite good cleanup and feed storage.
The tradeoff is higher cost, training, adjustment, and moving parts, so a treadle feeder is not automatically the best first purchase. Chickens usually need time to learn the mechanism, and lightweight or young birds may require careful adjustment so they can operate it reliably. The extra expense makes the most sense when repeated pest access is already costing enough feed, cleanup time, or frustration to justify better access control.
DIY Feeders And Whether Feed Should Stay Out All Day
DIY systems made from food-safe buckets or other suitable containers can be cheap and customized to the flock and available space. 🔧 Good designs use a secure lid, stable base, smooth cleanable surfaces, protected openings, and placement that prevents rain from entering. Poor designs can trap moisture, create sharp or awkward edges, or provide an opening that rodents can use just as easily as chickens.
Adult backyard chickens are commonly given free-choice access to a balanced complete ration during the day, allowing birds to eat in repeated small visits. That does not require leaving an exposed feeder available to wildlife all night, and some keepers remove or close open feeders after the flock is securely roosting. 🌙 A covered or treadle feeder may reduce that chore, but it still cannot replace dry storage, spill cleanup, and rodent exclusion.
Where To Put The Feeder And How High It Should Be
Place the feeder in a dry, covered, easy-to-see location where birds can approach without crowding and rain cannot repeatedly reach the feed. Avoid placing it under a roost, beside a leaking waterer, or in a muddy corner where droppings, splashes, and wet feet contaminate the feeding area. A sheltered run usually makes maintenance easier because preventing damp feed is simpler than trying to rescue it afterward.
For conventional hanging or tray feeders, keep the feeding lip roughly around the height of the backs of mature birds and adjust it as younger chickens grow. 📏 This makes it harder for birds to step into the tray, scratch bedding inside, or sweep large amounts of feed outward while still eating comfortably. Bantams, mixed-size flocks, young pullets, or birds with mobility problems may need a different height or an additional feeder.
The Daily Feeder Check That Prevents Bigger Problems
Use one simple routine: feed available → feed dry → no contamination → no rodent evidence. Confirm that feed is flowing, inspect the opening for dampness, clumping, mold, droppings, or bedding, and then look underneath for fresh spills or pest signs. 👀 Gnaw marks, rodent droppings, burrows, disturbed feed, or repeated nighttime losses mean the feeding system needs more than a quick sweep.
A few crumbs are normal, but repeated piles of feed should be treated as feedback about feeder height, fill level, opening size, placement, or flock behavior. Wet or moldy feed should not remain available to the flock, and scattered feed can attract rodents, wild birds, and insects. 🧹 Low maintenance should mean small daily checks prevent big cleanups, not that the feeder can be ignored for days.
Beginner Decision Table: Which Feeder Fits Your Setup?
| Feeder Setup | Budget | Low Maintenance | Pest Pressure | Small Flock | Main Tradeoff |
|---|---|---|---|---|---|
| Open or hanging | Low | High when sheltered | Best for low pressure | Excellent | Simple, but feed stays exposed |
| Port-style | Low to medium | High | Moderate | Excellent | Better containment, not automatically rodent-proof |
| Treadle | Medium to high | Medium after training | Better for higher pressure | Good | More expensive and needs training |
| DIY/container | Low to medium | Varies | Varies by design | Excellent | Results depend on the build |
For a beginner with a few hens and little pest pressure, a properly raised hanging feeder or a well-designed port feeder is often the simplest starting point. If rodents repeatedly reach the feed despite secure storage, cleanup, and coop exclusion, a treadle feeder becomes easier to justify. The goal is not to buy the most sophisticated equipment; it is to choose the simplest feeder that reliably solves your actual problem.
Judge the setup after a week by what you see around it rather than by capacity or marketing claims alone. 🐓 Less scattered feed, dry feed at the opening, comfortable access for every bird, easy cleaning, and fewer pest signs are strong indicators that the feeder suits your flock. A beginner-friendly feeding system is one you can fill, inspect, clean, and correct without turning daily chicken care into a complicated chore.